
Talking gear: 30,000km
Well I’ve finally reached the 30,000km mark on this journey, making it time for another on-the-road review of my equipment. Sitting with the thundering roar of Victoria Falls just down the road, this seems like a fitting place to mark another big milestone in the life of the Big Africa Cycle. From here I’m briefly heading into Botswana, before following the long and what looks like desolated road through the Caprivi Strip in Namibia. I anticipate arriving in Cape Town in approximately 3 months, but I’ve never been very good at planning things on a timescale.
The roads in recent months have improved dramatically, when I compare them with what I was cycling through this time last year, but another 10,000km has shown its toll on some of the components. This post may not appeal to some of my armchair travellers, so you will have to wait for the next post for some recent pictures/stories from here in Zimbabwe.
I frequently get asked questions about the gear I use, and desperately need to update the equipment page of this site, but if there is something I don’t cover here please share your questions in the comments section.
The Bike: Thorn Raven Tour
Mrs Thorn still doesn’t have a name, unlike many other bikes ridden similarly-long distances by like-minded individuals, but it seems too late to start referring to her as anything other than my trusty black-beauty. She, at least her main body, remains as strong and sturdy as her first days on the road. Sure there are some scratches, but that goes with the territory and the mileage.
When I first ordered the bike I was unsure about whether to go for the slightly larger frame, but standing over the bike there is about a 1” clearance between top tube and that part of my body which feels far better than it did about 7 weeks ago. Some people have asked what the foam tubing on the top tube is for. There is no specific reason. I originally put it on to make the bike appear less flashy, and then realised that it became a comfortable cushion when I was standing over the bike and wanted to take some of the weight off my legs by sitting on it. It’s also protected the frame when I’ve leaned the bike against walls/trees.

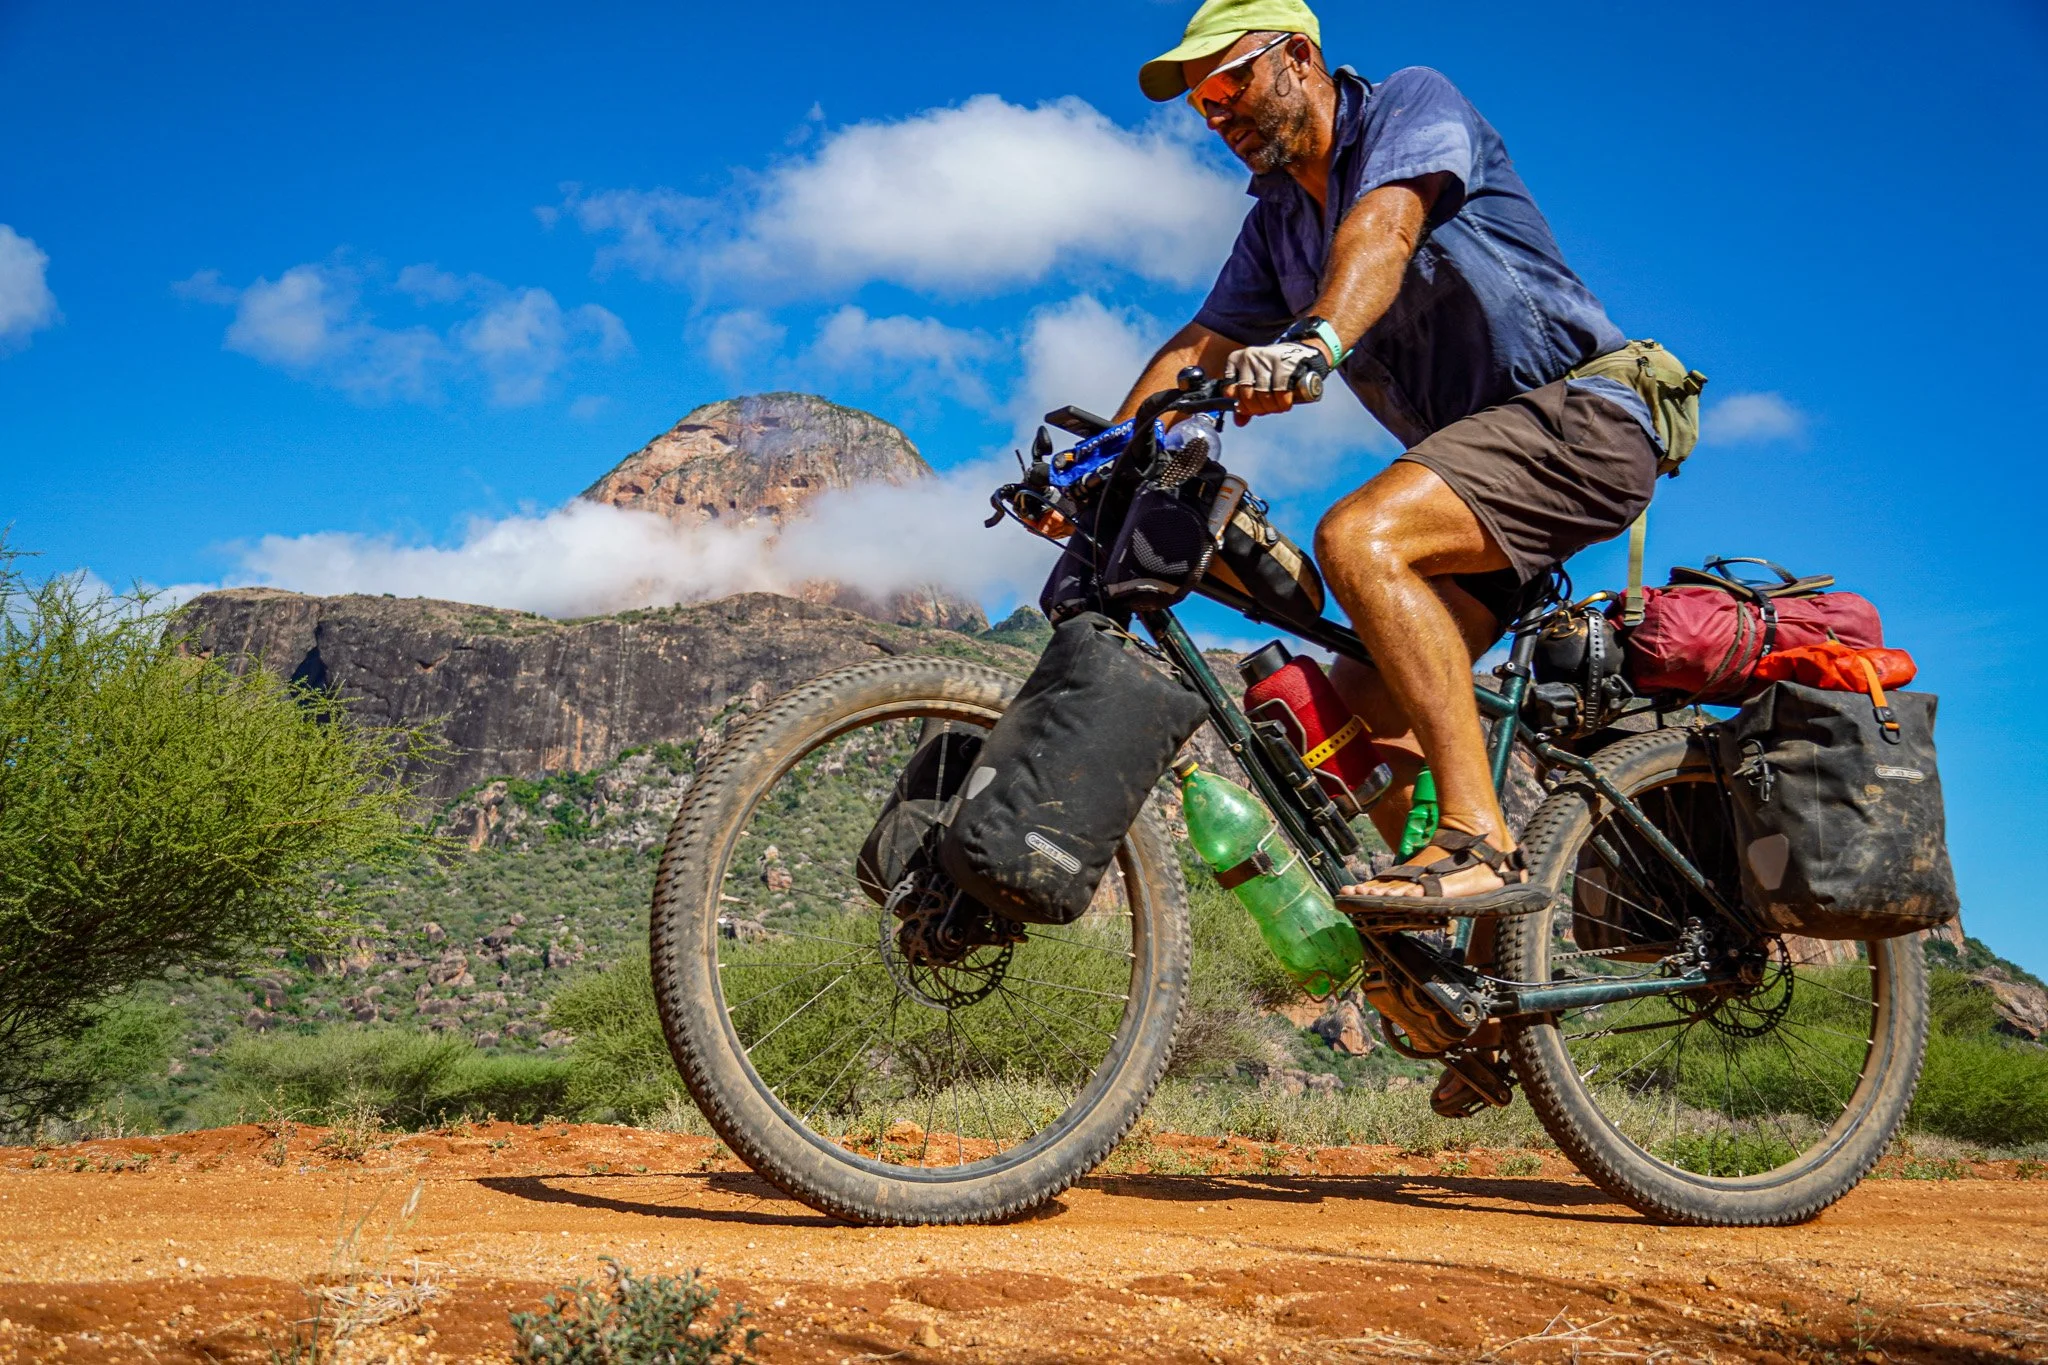
Me writing a gear review
Tyres
A few months ago I gave one of two spare Schwalbe XR tyres to a Japanese cyclist who desperately needed it. This tyre had already taken me 14,000km from the UK-Ivory Coast, and was being carried alongside another un-used Schwalbe XR. The Schwalbe XR’s I was running at the time (both put on as new in Ivory Coast) had done over 15,000km. About 300km after giving away the old spare the front tyre developed a split on the profile. This quickly expanded and I could start to feel the unevenness when cycling.

First worn Schwalbe XR
In Harare I switched the rear tyre to the front and placed the new Schwalbe on the back. Within another 100-200km this front tyre did the same so I was forced to go in search of another tyre when I arrived in Bulawayo.

Another one bites the dust
Rather than pay $80 for something imported from South Africa I bought a $10 tyre, which seems of reasonable quality and ‘should’ last the remaining 4000km or so that I plan are left on this tour. It is of course hard to tell. One of the main reasons I have used the now discontinued XRs is that I could almost guarantee at least getting 10,000km out of a new one. A lower quality one like this is a bit of a gamble, but tyres of 26x2.0 dimension (this is actually 26x1.95) can be found very easily in Africa.

New front tyre
Rims and Spokes
The ceramic Rigida rims remain strong and almost totally unworn by the effect of the brakes. This is quite remarkable when I remember the wear I came to associate with Mavic rims used on my last tour. As the picture shows there is some rust where the spoke nipples attach to the rims, but it has been a break-free 10,000km with these sapin spokes.

Rigida Rim
Brakes and cables
I changed all 4 brake pads in Malawi, having used the same ones for most of the trip. I tend to use my front brakes far more. The blue ceramic ones pictured here are far more costly than the replacement ones I have put on. I know disc brakes would give me far more control and sensitivity with braking, but for the needs of touring when split-second stopping isn’t usually necessary, I find v-brakes the ideal choice as there is very little that can go wrong. My front and rear brakes are Shimano Deore LX.
In Uganda last year I managed to break the rear brake cable as it had worn on its way through one of the metal casings on the frame. I easily replaced with another from a local shop.

Worn brake pads
Rohloff hub and gearing
Rohloff advise changing the hub oil in their gearbox every 5000km, which should mean I’m about to make the 6th oil change. Perhaps like some other long-term tourers, I’ve taken this 5000km recommendation a bit loosely. After approx 26,000km I made my 3rd oil change, having done the first at 6000km and the second at around 15,000km. The hub and gearing continues to run smoothly with no problem in shifting between 1st and 14th speed. I don’t know if I am lessening the life of the hub by not changing the oil more frequently? As I wrote about in my last gear review, if you are prepared to invest the money then I can only recommend a Rohloff hub for reliability, ease of maintenance, and durability in testing conditions.
Front Hub
No problems from the Shimano XT hub, but I allowed a very capable bike mechanic in Nairobi to clean and re-grease the ball-bearings as there was some noise when I free spun the front wheel.
Sprocket and chain
One should learn through experience and mistakes. After 14,000km on this tour I changed the rear sprocket after it had become so badly worn from the use of a single chain. Removing that sprocket was a massive effort requiring 4 people. After another 15,000km that second sprocket became worn again. I should have carried or bought another chain to place on that sprocket after the first 5000km or so, but foolishly have kept the same chain on the sprocket, allowing it to wear so much that the chain now slips when under force.

Worn sprocket
In Bulawayo last week I attempted to remove that sprocket, having had another one sent out to me along with a chain and front chain-ring. Seeming that I removed one before, I should have known that the direction the sprocket needs to be turned is in an anticlockwise direction. Well the idiot writing here was telling himself just this, as well as every Zimbabwean who attempted to help, but still applying force to the sprocket removal tool in an anticlockwise direction with the aid of a long-arm spanner inserted into a metal pole for leverage. I know this will probably only make sense to someone familiar with the hub and the removal of the sprocket.
The end result of perhaps half a ton of pressure in the wrong direction not only tightened the sprocket, but sheared the metal into which the sprocket removal tool inserts.

Sprocket with metal sheared
I decided to place the new chain back on this old sprocket and cycled some 400km+ from Bulawayo to Victoria Falls. At first the chain seemed to groove into the old sprocket, but it soon started to sporadically slip, which didn’t make for the most comfortable of rides. I attempted to remove it again here in Victoria Falls, this time in the right direction, but the sheared metal means that the sprocket removal tool doesn’t hold when I place ANTICLOCKWISE pressure on the chain-whip attached to the sprocket itself.
After admitting defeat I wondered if I would have to complete the rest of this trip with a chain that slips, but decided to send an e-mail with photos to Rohloff. Within 15 minutes a reply came back to say they had a tool that fits into the sprocket holes and can be attached to a compressor/air-gun in a garage workshop that removes nuts/bolts with the force that would be necessary to get this sprocket off. One of these special tools is now on its way by fed-ex to me here in Victoria Falls, but I’ve just discovered that there is no garage here with such a power tool. And so the plan is to cycle onwards to Botswana and Namibia and call in at every large garage/workshop/vehicle repair to find such a machine that does. Well it’s my fault, and I continue to kick myself for not applying force in the right direction from the beginning, having already been in this situation before.
The lesson is now finally learnt. Carry two chains and periodically change them so to not wear out the sprocket so quickly.
As for the front chain-ring, that is less worn out, but I have changed it with a new identical Surly chain-ring here in Victoria Falls.

Front chain-rings
Chain guard
I have received a number of e-mails from people asking about the plastic chain guard that encloses my chain-set. I had hoped that it would prevent the previous chain and sprocket from wearing as quickly as it has done, but I have possibly become careless in cleaning, oiling and checking the chain regularly since it is not visible beneath the guard, and I assume that no water or dirt gets in. This said, I have found it to be a tremendous help in protecting the chain from most dirt.
SJS cycles, from where I bought my bike, do not include the Hebie chain-guard with the Thorn models when sold as their own front chain-ring is too thick for the chain-guard to fit over. For this reason I have been using a Surly 38T front chain-ring, which requires some washers between the chain-ring nuts and chain-ring itself, to be held in place tightly.

Front chain guard
Handlebars and tape
Another question I’m occasionally asked refers to the butterfly handlebars I use. These I bought and put on my old bike in Thailand, and I have always appreciated the extra hand-positioning that butterfly bars provide. The bar tape has covered up what particular company manufactured them, but I don’t remember them being expensive and they have taken me over 60,000km. Incidentally the leather bar tape is manufactured by Brooks, and provides a soft, but firm grip.

Brooks bar tape
Side mirror
For the past several months I have been using a Zefal side mirror, which attaches simply to the side of my butterfly bars. This proves useful on a number of narrow roads, but can be a little cumbersome when leaning the bike against a wall as I have to remember turning the mirror inwards. It has already become scratched, but will continue to provide good use for the remainder of the trip.
At various stages over the years I have bought cheap Chinese-branded mirrors, but found these either too large and difficult to attach or more likely to be move/vibrate as I cycle along.

Side mirror
Racks
My Thorn expedition rear rack and Surly Front rack continue to be strong and show no signs of weakness. To provide a tighter fit between pannier clips and rack, and also to protect the racks from rust, I have applied duck tape, as pictured here, to where the panniers attach. Many a pineapple and watermelon, besides extra water bottles, have made use of the large platform on the front rack.

Thorn Expedition Rear Rack
Pedals
The original pedals from the start of the trip are still on. When I had the bearings cleaned and re-greased in the front hub I did so for the bearings within the pedals. The toe-straps provide the protection and grip I need, and despite occasionally thinking of trying out SPD pedals, I think the use of trekking-type sandals is a much better choice for touring in Africa. Crossing water and pushing through sand really would not have been suitable over a long period of time for any SPD shoe, and I’m comfortable walking around in Teva sandles, which I don’t feel I would be with shoes that click on hard surfaces.
Saddle
Do I blame my Brooks B17 leather saddle for causing my testicular torsion? At first I felt it was the cycling and friction between me and saddle that was to blame, but in hindsight I almost certainly now know that it was a cold shower totally un-related to the cycling that caused it. Many non-cyclists often tap the saddle and remark how rock hard it is, the reply to which is that my saddle is like a good pair of walking boots, once broken in they are moulded to you and uncomfortable for anyone else. Very long days on the bike (more than 8 hours) do make for a sore posterior, but I’m not sure any saddle is really that comfortable after such a period of time.

Brooks Saddle
I’ve not been great at following Brooks’ guidelines for looking after my saddle. For the past 2 years I’ve been carrying some kiwi brown shoe polish to protect it and give it a nice shine, but a number of cracks have developed around the rivets which run around the back of the saddle. These are also well-rusted.

Brooks saddle
Cycle computer
As a free gift for joining the CTC club magazine some years back, I received a cordless Trek cycling computer, which proved marvellous on this tour until about 2000km ago. I changed batteries in both computer and sensor, but there is something still not working so I decided to replace it with a spare Cateye velo 8 computer (corded), which I was using at the end of my last tour. On my last tour I had several computers disappear when foolishly leaving them on the bike, even only for a short moment when walking into a shop. This time it has become a matter of habit to remove the computer, along with my handlebar bag, every time I leave the bike unattended.
Kickstand
I’ve never understood people who manage to tour in remote places without a kickstand. There are too many places where there is nothing to lean the bike against and so having a kickstand is invaluable in preventing the bike from being laid down on the road when nature calls in the middle of nowhere. I’m sure there are many strong kickstands out there, but the ESGE double kickstand I’ve been using from the start of this trip continues to be reliably strong.
Camping Equipment
MSR Hubba Hubba tent
After more than 250 nights in my tent, I can say with high assurance that the MSR Hubba Hubba is a great tent for cycle touring in Africa. I believe MSR are now even selling the tent with a green flysheet, which is much more suitable than the bright yellow it has been sold with for a number of years. Several small holes have developed in the inner-mesh (possibly through mis-care when packing away) over which I’ve used duck-tape to prevent any insects from ruining my night’s sleep. New tent poles had to be sent out to me when the last ones disappeared with many other things in that Kenyan theft last year, but there was no sign of weakness in them. I think the comments I have made in previous gear reviews about the tent still stand.
Sleeping mattress and Sleeping bag/pillow
The Thermarest mattress which I started the trip with died shortly after writing my last gear review. De-lamination is what Thermarest referred to it as. The mattress lining came away from what maintains its rigidity and one bubble soon expanded to make the entire surface balloon-like. Thermarest responded promptly to my e-mail and sent a replacement air-mattress out, but I found it too heavy and bulky and asked for the prolite version, which is the thinnest and lightest that thermarest sell in that range, and almost identical to the one that eventually died after 4 years of regular use. This new one I have been using since Kenya inflates and deflates quickly, and packs away very tightly.
I make regular use of my Cumulus Sleeping bag and the comments I provided in the last review still stand. A few small holes have occasionally developed in some of the seams, which have been hand-sown to prevent the feathers falling out.
I have been using a cheap Gelert inflatable sleeping pillow, but like previous inflatable pillows I find that it is susceptible to developing minute holes on the seams that cause it to deflate overnight. My current pillow has 3 puncture repair patches keeping it from deflating.
Stove and cooking equipment
Everything remains functioning as it was in my last review. The Primus Ominifuel stove needed serious cleaning after the DRC, which is no doubt down to the dirty fuel I was running it on then. I stripped it apart and soaked each part in white spirit over night, which seemed to do the trick. There have been no problems running it since then.
Panniers and bags
The original bags are still going strong, albeit quite well sun-faded. I’ve written before about my fondness for the simplicity of Ortlieb panniers and would use them again on another tour. The same goes for my spacious 10-litre handlebar bag, sufficiently large enough to fit almost all of my most valuable possessions in. As for camping gear, it remains neatly stuffed into the rear dry-bag.
Electronics
Following that clean sweep of most of my electronic goods last year in Kenya, the gear I had in the last review has been replaced with new equipment, some of which is the same as before, other items are new.
Camera: Nikon D90 + 18-200mm lens and Velbon Ultra maxi L tripod
I have stuck with the same camera model, albeit not the same one, from the start of the trip. There are times where I feel a smaller more discreet camera would be more suitable for occasions where drawing excess attention to oneself isn’t desirable, but overall the D90 fits somewhere in the middle price ground for people keen on photography. As for the lens, the wide focal range provides coverage for most situations on the road.
The tripod I now have is perhaps the ideal tripod for touring. Finding a balance between weight and strength is hard, but the Velbon maxi weighs less than 1kg and happily supports the 1.5 kg or so of camera that goes onto it. It also folds up to less than 40cm in length and fits nicely across the front rack. For some months I had used a gorilla-pod, which is a great little tripod, but there were occasions when I wanted the extra height. I think the Velbon extends to 170cm.

Velbon tripod
Laptop and hard-drive
My current Asus EEC netbook is almost identical to the one that was stolen. It’s compact at just over 1kg and offers superb battery life, which is the main reason I bought it.
I m currently carrying a 1 terabyte hard-drive, having sent home a 500gb hard-drive with photos backed up in Malawi. Both laptop and hard-drive slot safely and securely into a side pocket with one of the rear panniers.
Ipod and speaker
On the road music is provided for by an Ipod touch, along with an X mini-speaker. The latter is cheap, compact and highly recommended for tourers as it boosts good quality sound for its size, and rests comfortably and fairly securely on the handlebars between my water bottle cage and handlebar bag.

Itouch and speaker
Phone: Samsung Galaxy Next
I recently joined the smartphone World of technology by purchasing a phone which allows me to check Internet on the go. This is a great advantage as it allows me to reply to e-mails much more quickly, rather having to do it all together on my laptop. Since my last gear review I have been using USB dongles in some countries to have Internet on the go (using mobile signals), but in Zimbabwe the cost is too high and although I had hoped to just purchase one dongle and have it unlocked to use with different sim cards in other countries, the reality has often been having to purchase a new dongle. Spending $180 on a new phone seemed like a good investment.
Clothes
Unsurprisingly not much remains from the list of clothes I set off with some 2.5 years ago. The North Face cross trainers are still intact, but get irregular use, as does my long sleeve Craghopper fleece for cold mornings and evenings. The Craghopper zip-offs I set off with are now just shorts since one of the zippers broke.
In one of Uganda’s many second-hand clothes markets I purchased a cheap pair of jeans, something which wouldn’t feature in the panniers of many cycle-tourers, but I came to miss wearing jeans in the evenings (when in towns) and haven’t found them particularly heavy to carry.
Thanks to Rohan I now have a wonderfully comfortable pair of zip-off trousers and a short-sleeve shirt, which were sent out to me in Malawi.
I continue to wear the same blue sleeveless shirt for cycling in, which miraculously hasn’t faded in all that sun. Padded cycling shorts also continue to offer at least some cushioning, which are worn beneath a pair of Patagoinia-branded swim shorts I found in a market in Tanzania.
On my feet when cycling is a pair of imitation Teva sandals I bought in Ghana. They have been stitched and repaired dozens of times, but they might just make it to Cape Town. A few weeks ago I bought a pair of leather slip-on sandals, which I wear most of the time when not cycling.

Teva sandals
Perhaps my most trusted piece of clothing remains the Tilley hat, a distinguishing feature of the Big Africa Cycle. More than slightly faded and almost lost on a number of occasions this has prevented my ever so bald head from burning under the African sun.

My trusted Tilley
Other than a few t-shirts I’ve picked up along the way and my Nigerian-made colourful pants that’s almost it clothes wise. Not much really is it?
Conclusion
There are various bits of equipment I may have left out here, but I’ve covered the essentials. Weight wise it’s about 25kg all combined, minus water and what food I might be carrying. Comments as always are welcomed and appreciated, as well as advice regarding gear, maintenance etc.

